Solar Winds are streams of
charged particles that are ejected
from the upper atmosphere of the
Sun. They consist of electrons,
protons, and other ions that are
expelled from the Sun at high
speeds, typically around 400 km/s.
Solar winds are a natural phenomenon
that occurs continuously, but their
intensity can vary over time. During
periods of increased solar activity,
such as during solar flares and
coronal mass ejections, the solar
wind can be more intense.
SCANNING ACTIVITY
Using ping test on Microsoft Windows
To use the ping program on Microsoft Windows, follow
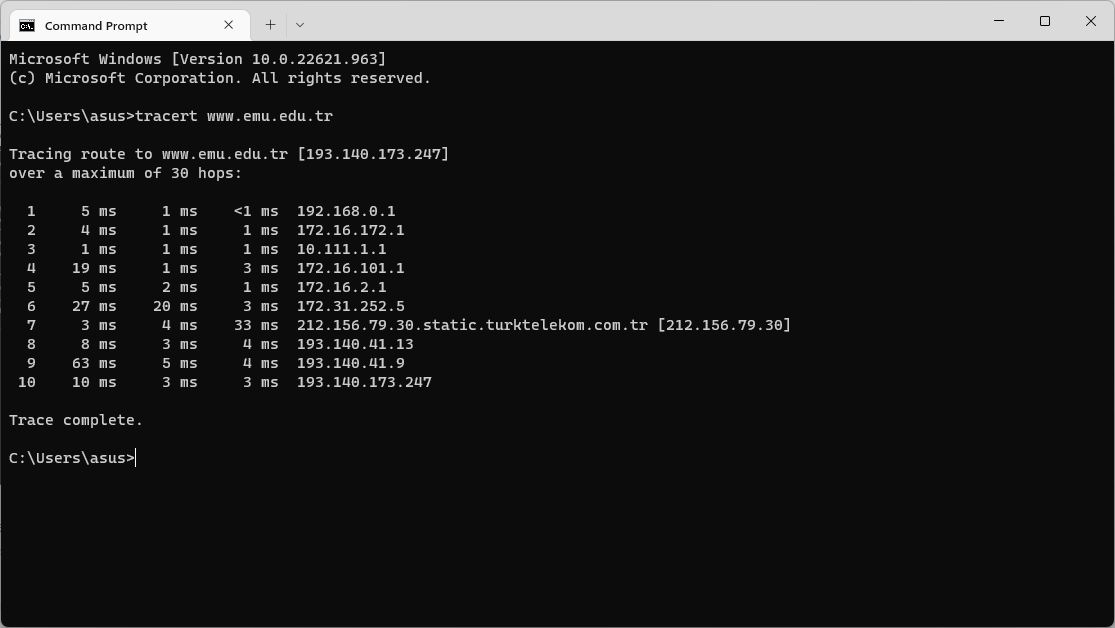
these steps: Interpret the output from tracert: Tracert
displays each hop, indicated by a number in the left
column. It also displays the domain and IP address at
each hop, as well as the time spent. For example, the
following output shows the path to an A2 Hosting server:
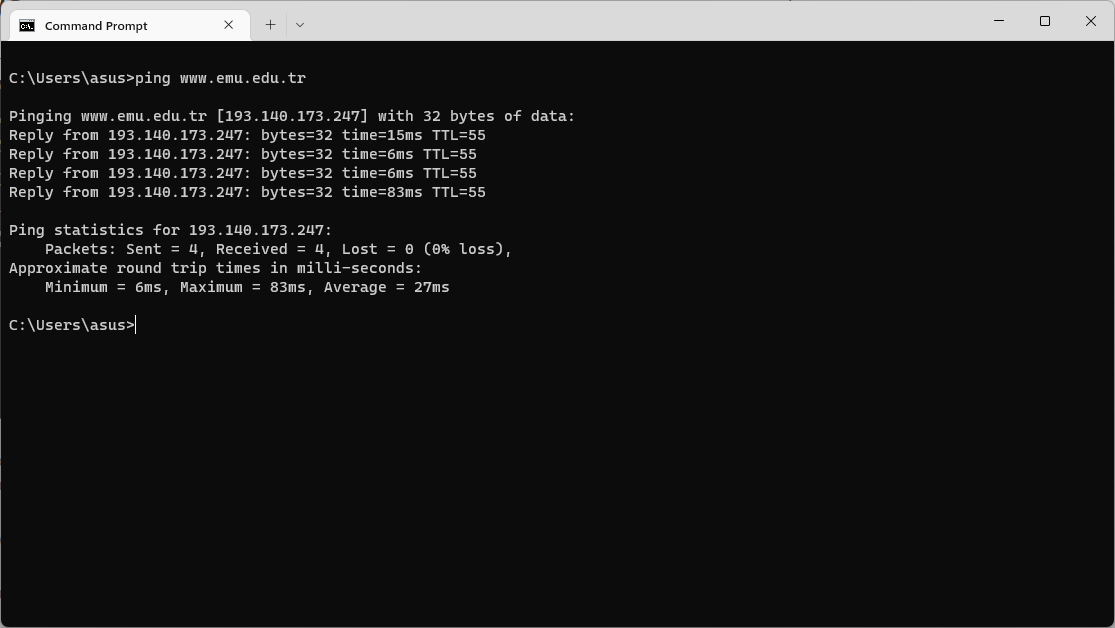
Interpret the output from ping: If the remote
host is active and configured to respond to ping
requests, responses appear. For example, the
following output shows ping responses from an A2
Hosting server:
C:\Users\asus> ping www.emu.edu.tr
Pinging www.emu.edu.tr [193.140.173.247] with 32
bytes of data:
Reply from 193.140.173.247: bytes=32 time=8ms
TTL=55 Reply from 193.140.173.247: bytes=32
time=7ms TTL=55 Reply from 193.140.173.247:
bytes=32 time=5ms TTL=55 Reply from
193.140.173.247: bytes=32 time=3ms TTL=55 Ping
statistics for 193.140.173.247: Packets: Sent =
4, Received = 4, Lost = 0 (0% loss), Approximate
round trip times in milli-seconds: Minimum =
3ms, Maximum = 8ms, Average = 5ms
Using tracert on Microsoft Windows
On Windows-based systems, use the tracert program to
test the path to a server. To do this, follow these
steps: Open a DOS command window. To do this, click
Start, click Run, type cmd, and then press Enter. At the
command prompt, type the following command. Replace
example.com with the domain that you want to test:
C:\Users\asus>tracert www.emu.edu.tr
Tracing route to www.emu.edu.tr
[193.140.173.247]
over a maximum of 30 hops: 1 2 ms 4 ms <1 ms
192.168.0.1 2 1 ms <1 ms 14 ms 172.16.172.1 3 10
ms 1 ms 1 ms 10.111.1.1 4 4 ms 1 ms 1 ms
172.16.101.1 5 1 ms 9 ms 1 ms 172.16.2.1 6 3 ms
2 ms 11 ms 172.31.252.5 7 4 ms 4 ms 4 ms
212.156.79.30.static.turktelekom.com.tr
[212.156.79.30] 8 4 ms 3 ms 4 ms 193.140.41.13 9
15 ms 67 ms 30 ms 193.140.41.9 10 11 ms 9 ms 24
ms 193.140.173.247 Trace complete.
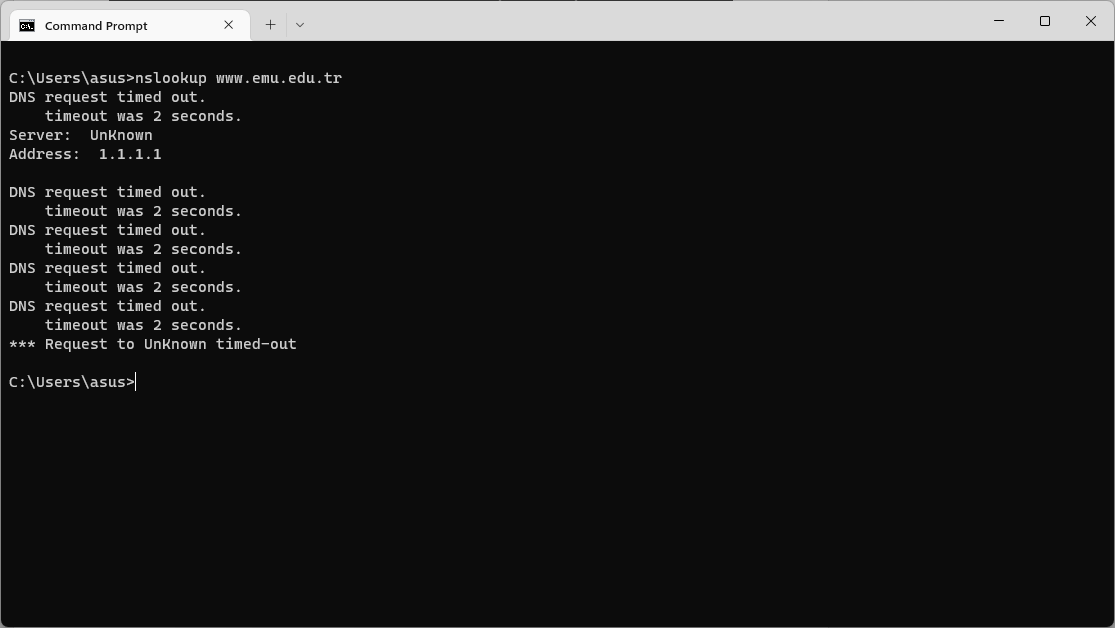
Using nslookup on Microsoft Windows
basic scanning tools such as
traceroute,
mtr,
dig,
nslookup,
whois,
nmap
and
telnet
to extract useful
information.
DOS ATTACK
How does Dos Attacks happens?
A Denial of Service (DoS) attack is
a type of cyber attack in which a
malicious actor seeks to make a
network or computer resource
unavailable to its intended users.
This is typically accomplished by
flooding the target with traffic or
requests for connections,
overwhelming the resources of the
network or server and making it
unable to respond to legitimate
requests.
There are several
methods that can be used to carry out a DoS
attack. Some of the most common include:
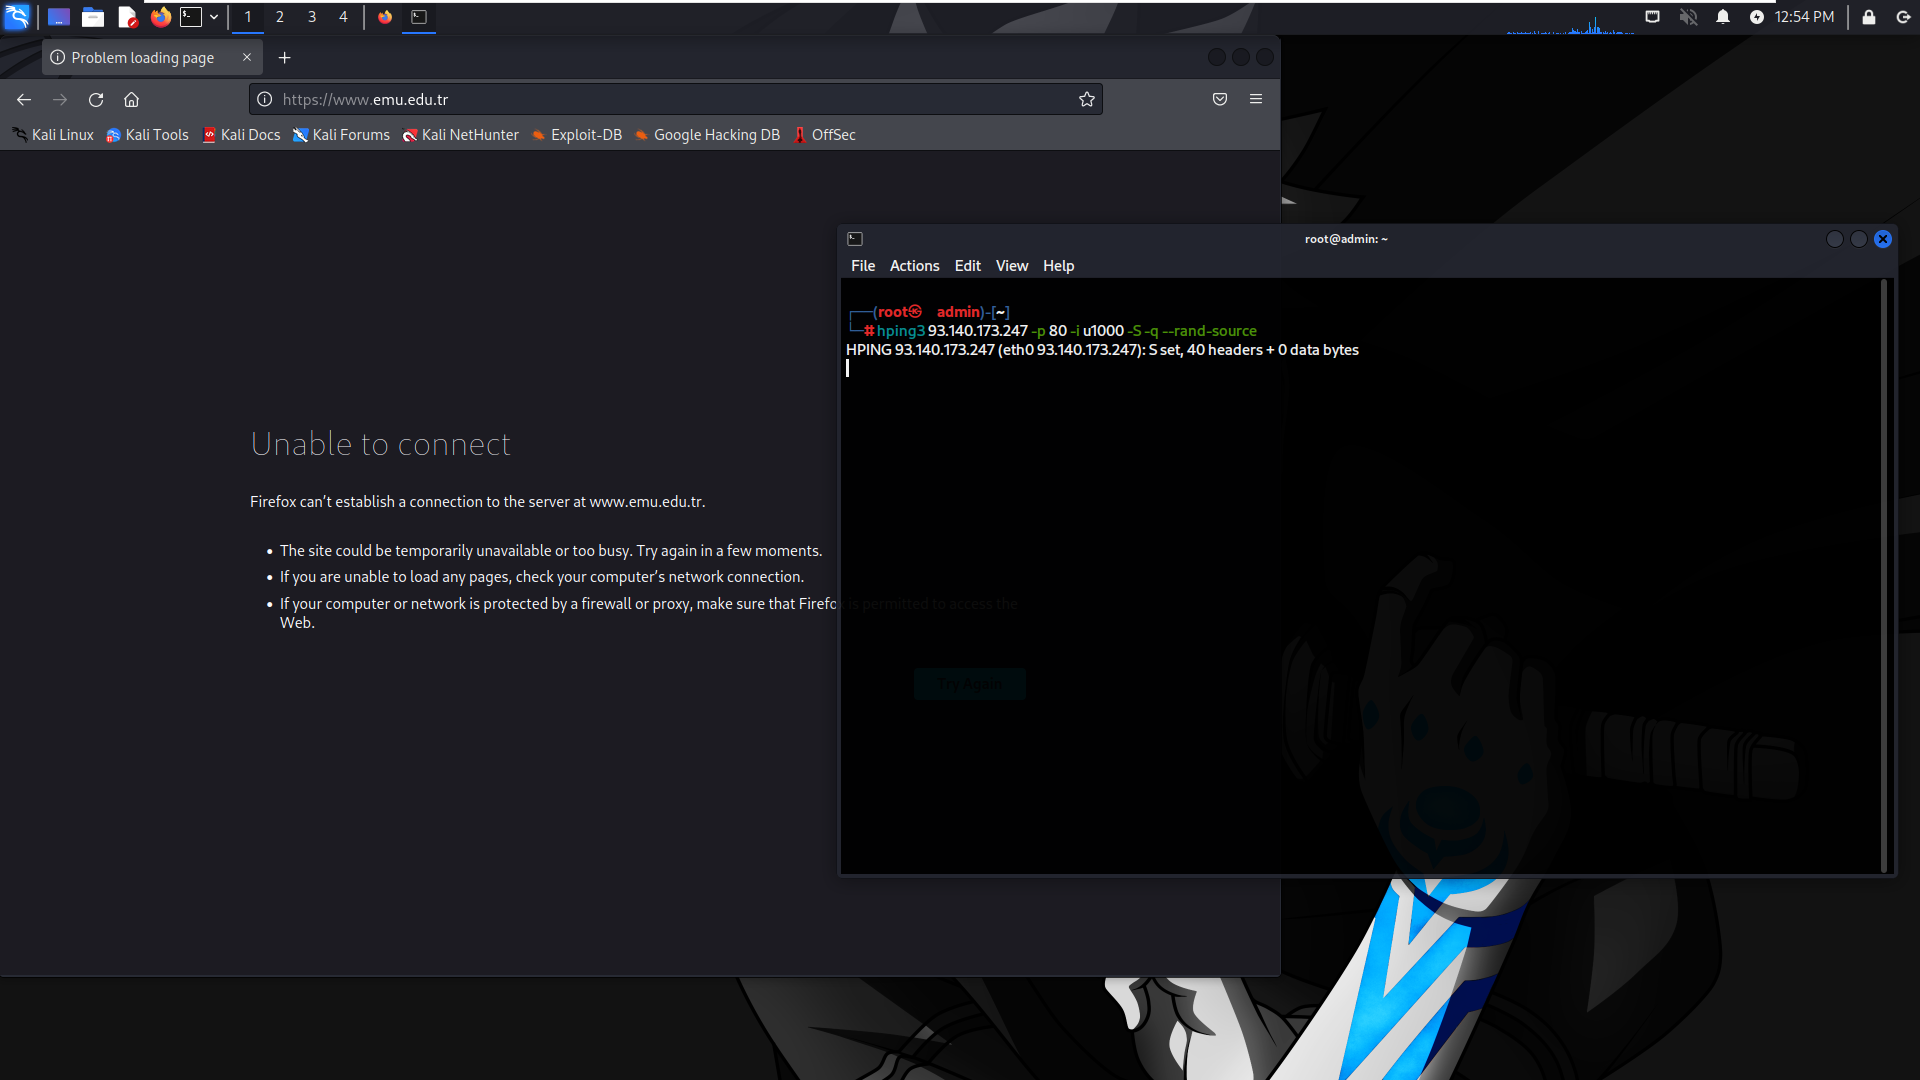
Ping flood: This involves sending a
large number of ping requests to a
target, with the goal of overloading the
server and making it unable to respond
to legitimate requests.
SYN flood: This type of attack
involves sending a large number of SYN
requests (a type of packet used to
initiate a TCP connection) to a target,
with the goal of exhausting the target's
resources and making it unable to
respond to legitimate requests.
HTTP flood: This involves sending a
large number of HTTP requests to a
target, with the goal of overwhelming
the server and making it unable to
respond to legitimate requests.
DDoS attack: A Distributed Denial of
Service (DDoS) attack involves using a
network of compromised computers (called
a "botnet") to flood a target with
traffic. This type of attack is
particularly difficult to defend
against, as it can involve traffic from
many different sources.
It is important to note that DoS attacks
can be difficult to defend against, as they
often involve a large volume of traffic and
can be difficult to trace to their source.
However, there are a number of measures that
organizations can take to protect against
DoS attacks, such as implementing network
firewalls and load balancers, and using rate
limiting and traffic filtering techniques.
A man-in-the-middle (MITM) attack is a type
of cyber attack where an attacker intercepts
and manipulates communication between two
parties who believe they are communicating
directly with each other. In an MITM attack,
the attacker is able to "sit in the middle"
of the communication and can alter,
intercept, or block messages between the two
parties.
MITM attacks can take many forms
and can be difficult to detect, as the two
parties may not realize that their
communication has been compromised. Common
techniques used in MITM attacks include
interception of unencrypted communication,
the use of spoofed IP addresses, and the use
of malicious software or hardware to
intercept communication.
MITM attacks can be highly successful, as
they allow the attacker to gain access to
sensitive information and potentially
compromise the security of the two parties
involved in the communication. It is
important for individuals and organizations
to be aware of the risks associated with
MITM attacks and to take steps to protect
themselves, such as by using encryption and
implementing strong security measures.
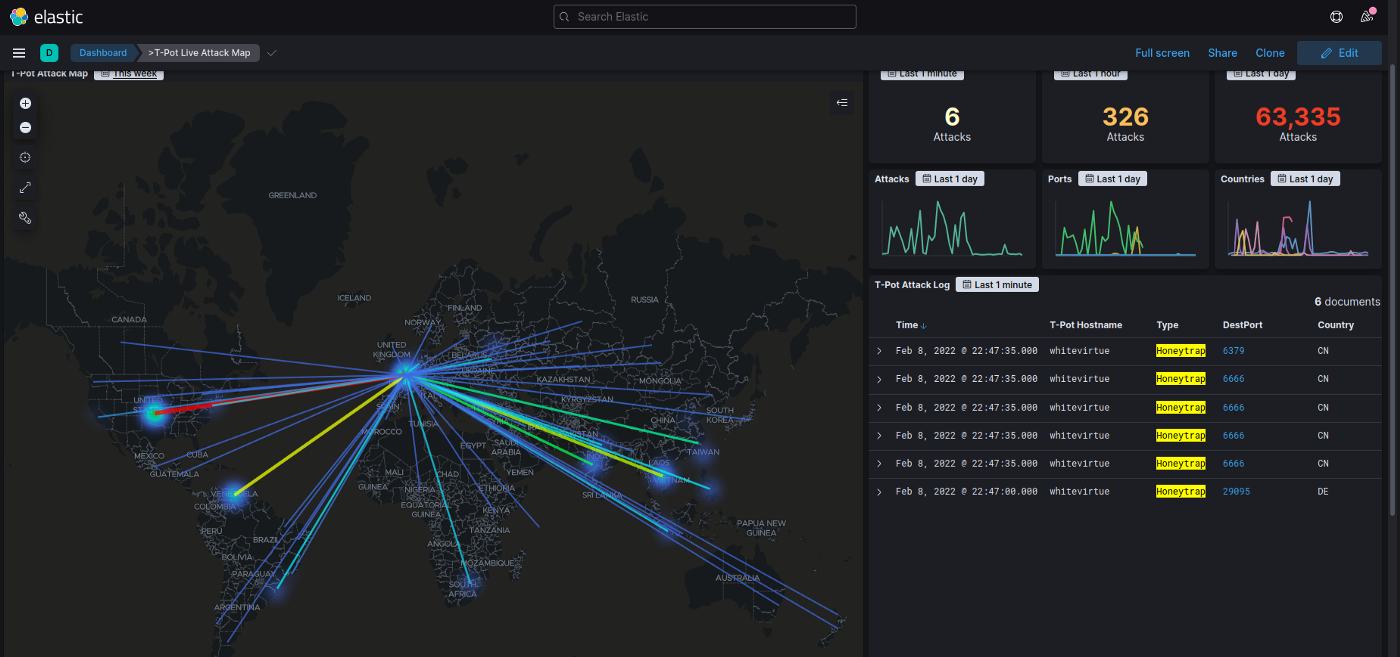
HONEY-POT
A honeypot is a security tool that
is used to detect and defend against
cyber attacks. It is essentially a
trap set up to lure in attackers, in
the hope that they will reveal
themselves and their tactics while
interacting with the honeypot.
There are different types of
honeypots, ranging from
low-interaction honeypots that are
designed to collect information
about potential attackers and their
tactics, to high-interaction
honeypots that are designed to
closely mimic a real network or
system and capture as much
information as possible about the
attackers and their methods.
Honeypots are often used as part of a
larger security strategy, as they can help
organizations to detect and defend against
attacks, gather intelligence about potential
threats, and understand the tactics and
motivations of attackers. They can also be
used to distract attackers and divert their
attention away from more valuable resources.
One important thing to note about
honeypots is that they should not be used as
the primary means of protecting a network or
system. They should be used in conjunction
with other security measures, such as
firewalls and intrusion detection systems,
in order to provide a comprehensive security
solution.
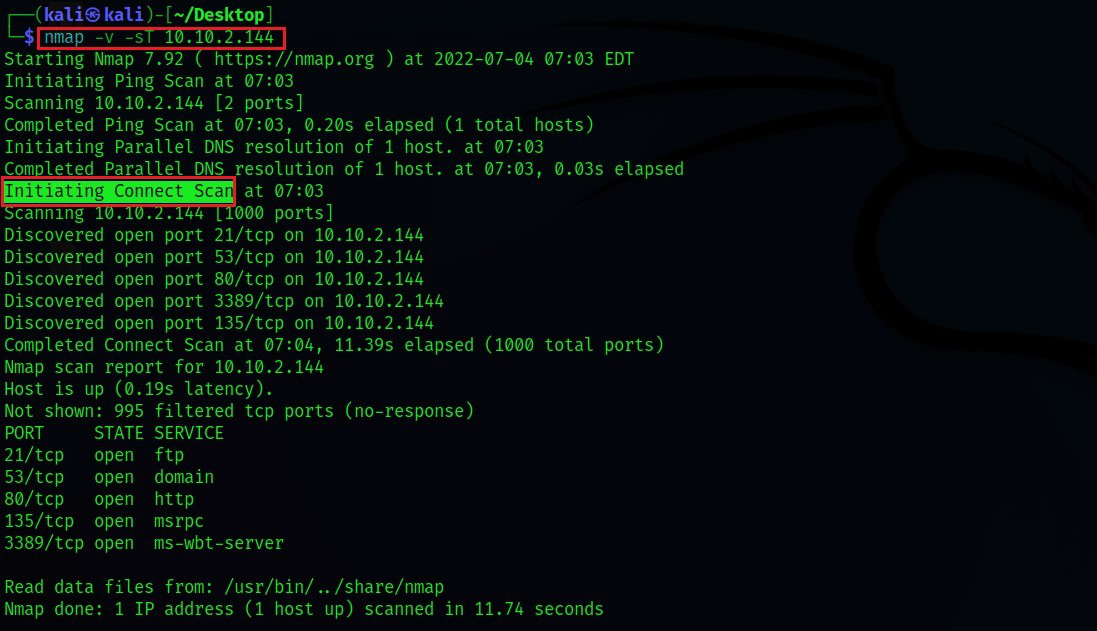
Nmap is a
security auditing tool used in the security
field to actively enumerate a target
system/network. It is one of the most
extensively used tools by network
administrators and conversely attackers for
reconnaissance (enumeration), the first step
in the 5 phases of hacking. Nmap is used to
actively probe the target network for active
hosts(host discovery), port scanning, OS
detection, version details, and active
services running on the hosts that are up.
For this, Nmap uses the technique of sending
packets and analyzing the responses. To
learn more about please refer to the article
Nmap.
Port Scanning
is one of the features of Nmap wherein the
tool detects the status of the ports on
active hosts in a network. The status of the
ports can be open, filtered, or closed. Type
Nmap in the command line to run Nmap. Add
necessary switches according to the scanning
type to initiate a specific scan technique.
Example:
nmap -sS 192.168.0.1-192.168.0.52
This command
runs Nmap in TCP SYN scan type (-sS) and
scans the given IP address range for active
hosts and services.
Please refer
to the article
Port Scanningg to learn more about it.
Types
of Port Status:
Open: The open status means
that the given port is open and is
actively running a service.
Filtered: The filtered status
means that the respective port might be
hidden behind a firewall and its status
remains unknown.
Closed: The closed state
represents a given port is closed on the
host machine.
Different Port Scanning Techniques in Nmap:
The following
are the extensively used scanning techniques
in Nmap:
1. TCP
Connect Scan(-sT):
TCP Connect scan uses the concept of a full
three-way handshake
If the
connection does not exist (CLOSED) then
a reset is sent in response to any
incoming segment except another reset.
In particular, SYNs addressed to a
non-existent connection are rejected by
this means.
What it
essentially means is that if Nmap sends
a TCP request to a closed port with its
SYN flag set, then it receives a TCP
packet with its RESET FLAG set from the
target server. This tells Nmap that the
specified port is closed.
Otherwise, if the port is actually open,
then Nmap receives a response with SYN/ACK
flags set responding to the packet sent
by Nmap with its SYN flag set.
The third possibility is that if a port
is filtered, most of the server's
firewalls are configured to just drop
incoming packets. Nmap doesn't receive
any response back. This essentially
means that the given port is running
behind a firewall filtered.
2. TCP SYN
Scan (-sS): SYN scans are often called
"Half-open" or "Stealth" scans. SYN scan works
the same way as TCP Connect scan with closed and
filtered ports i.e receives a RST packet for
closed port and no response for filtered ports.
The only difference is in the way they handle
the open ports. SYN scan sends a response packet
to the server with its RESET FLAG set(but not
ACK which is usually the default in the actual
three-way handshake) after receiving SYN/ACK
from the target server. This is to avoid the
server from continuously making requests to
establish a connection and thereby reduce the
scan time.
This scan type is referred
to as a stealth scan due to the following advantages:
Faster because it
doesn't have to complete the full three-way
handshake.
Some applications
often log only those connections that are fully
established. So applications listening on open ports
do not log these connections which makes SYN scan
"stealthy".
3. UDP Scan (-sU):
UDP unlike TCP, doesn't perform a handshake to
establish a connection before sending data packets to
the target port but rather sends the packets hoping that
the packets would be received by the target port. That
is why UDP connections are often called "stateless".
This type of connection is more efficient when speed
dwarfs quality, like in video sharing. As there will be
no acknowledgment from the target port whether it has
received the packet, UDP scans become more difficult and
very much slower.
When there's no
response from the target port after sending a UDP
packet, it often times means that the port is either
"open" or is running behind a firewall i.e
"filtered" in which case the server would just drop
the packet with no response.
UDP scan can
effectively identify closed ports as the target UDP
port responds with an ICMP packet with a message
that the port is unreachable.
The below scan techniques
are very less likely to be used in real-time but it's
worth learning the principle behind them. They are said
to be even stealthier than the "SYN stealth"
scan.
For the below scan types,
when a packet is sent to an "open" port, there won't be
any response from the target port which is very similar
to the UDP scan. When the below scan types don't get a
response, they would mark the port as being
open/filtered. As per RFC 793, for malformed packets,
the closed ports on the server are mandated to respond
with an RST TCP packet and no response at all for open
ports.
TCP NULL Scan
(-sN): NULL scan, as the name implies,
sends a TCP packet with no flags set. If the port is
closed, the host responds with an RST.
TCP FIN Scan
(-sF): FIN scan, rather than sending
completely empty packets, it sends a packet with its
FIN flag set. If the port is closed, the host
responds with an RST.
TCP XMAS Scan
(-sX): XMAS scan, sends a packet with
URG,PSH,FIN flags set. This scan got its name from
the appearance it gives of a Christmas tree when
viewed as a packet capture in Wireshark. If the port
is closed, the host responds with an RST.
PuTTY is a free and open-source terminal
emulator, serial console, and network file
transfer application. It supports several
network protocols, including SSH, Telnet,
and rlogin, and is commonly used to connect
to remote servers and devices for the
purpose of managing and configuring those
systems.
PuTTY is available for Windows,
Linux, and MacOS, and can be used to connect
to a variety of network devices, including
routers, switches, firewalls, and servers.
It is a popular choice among system
administrators and network professionals due
to its versatility and wide range of
features, including support for secure
connections, customizable terminal
emulation, and the ability to save and
recall session configurations.
In addition to its use as a terminal
emulator, PuTTY can also be
used as a simple network client for
various network protocols, such as
SCP (Secure Copy) and SFTP (SSH File
Transfer Protocol), allowing users
to transfer files between systems
over a network connection.
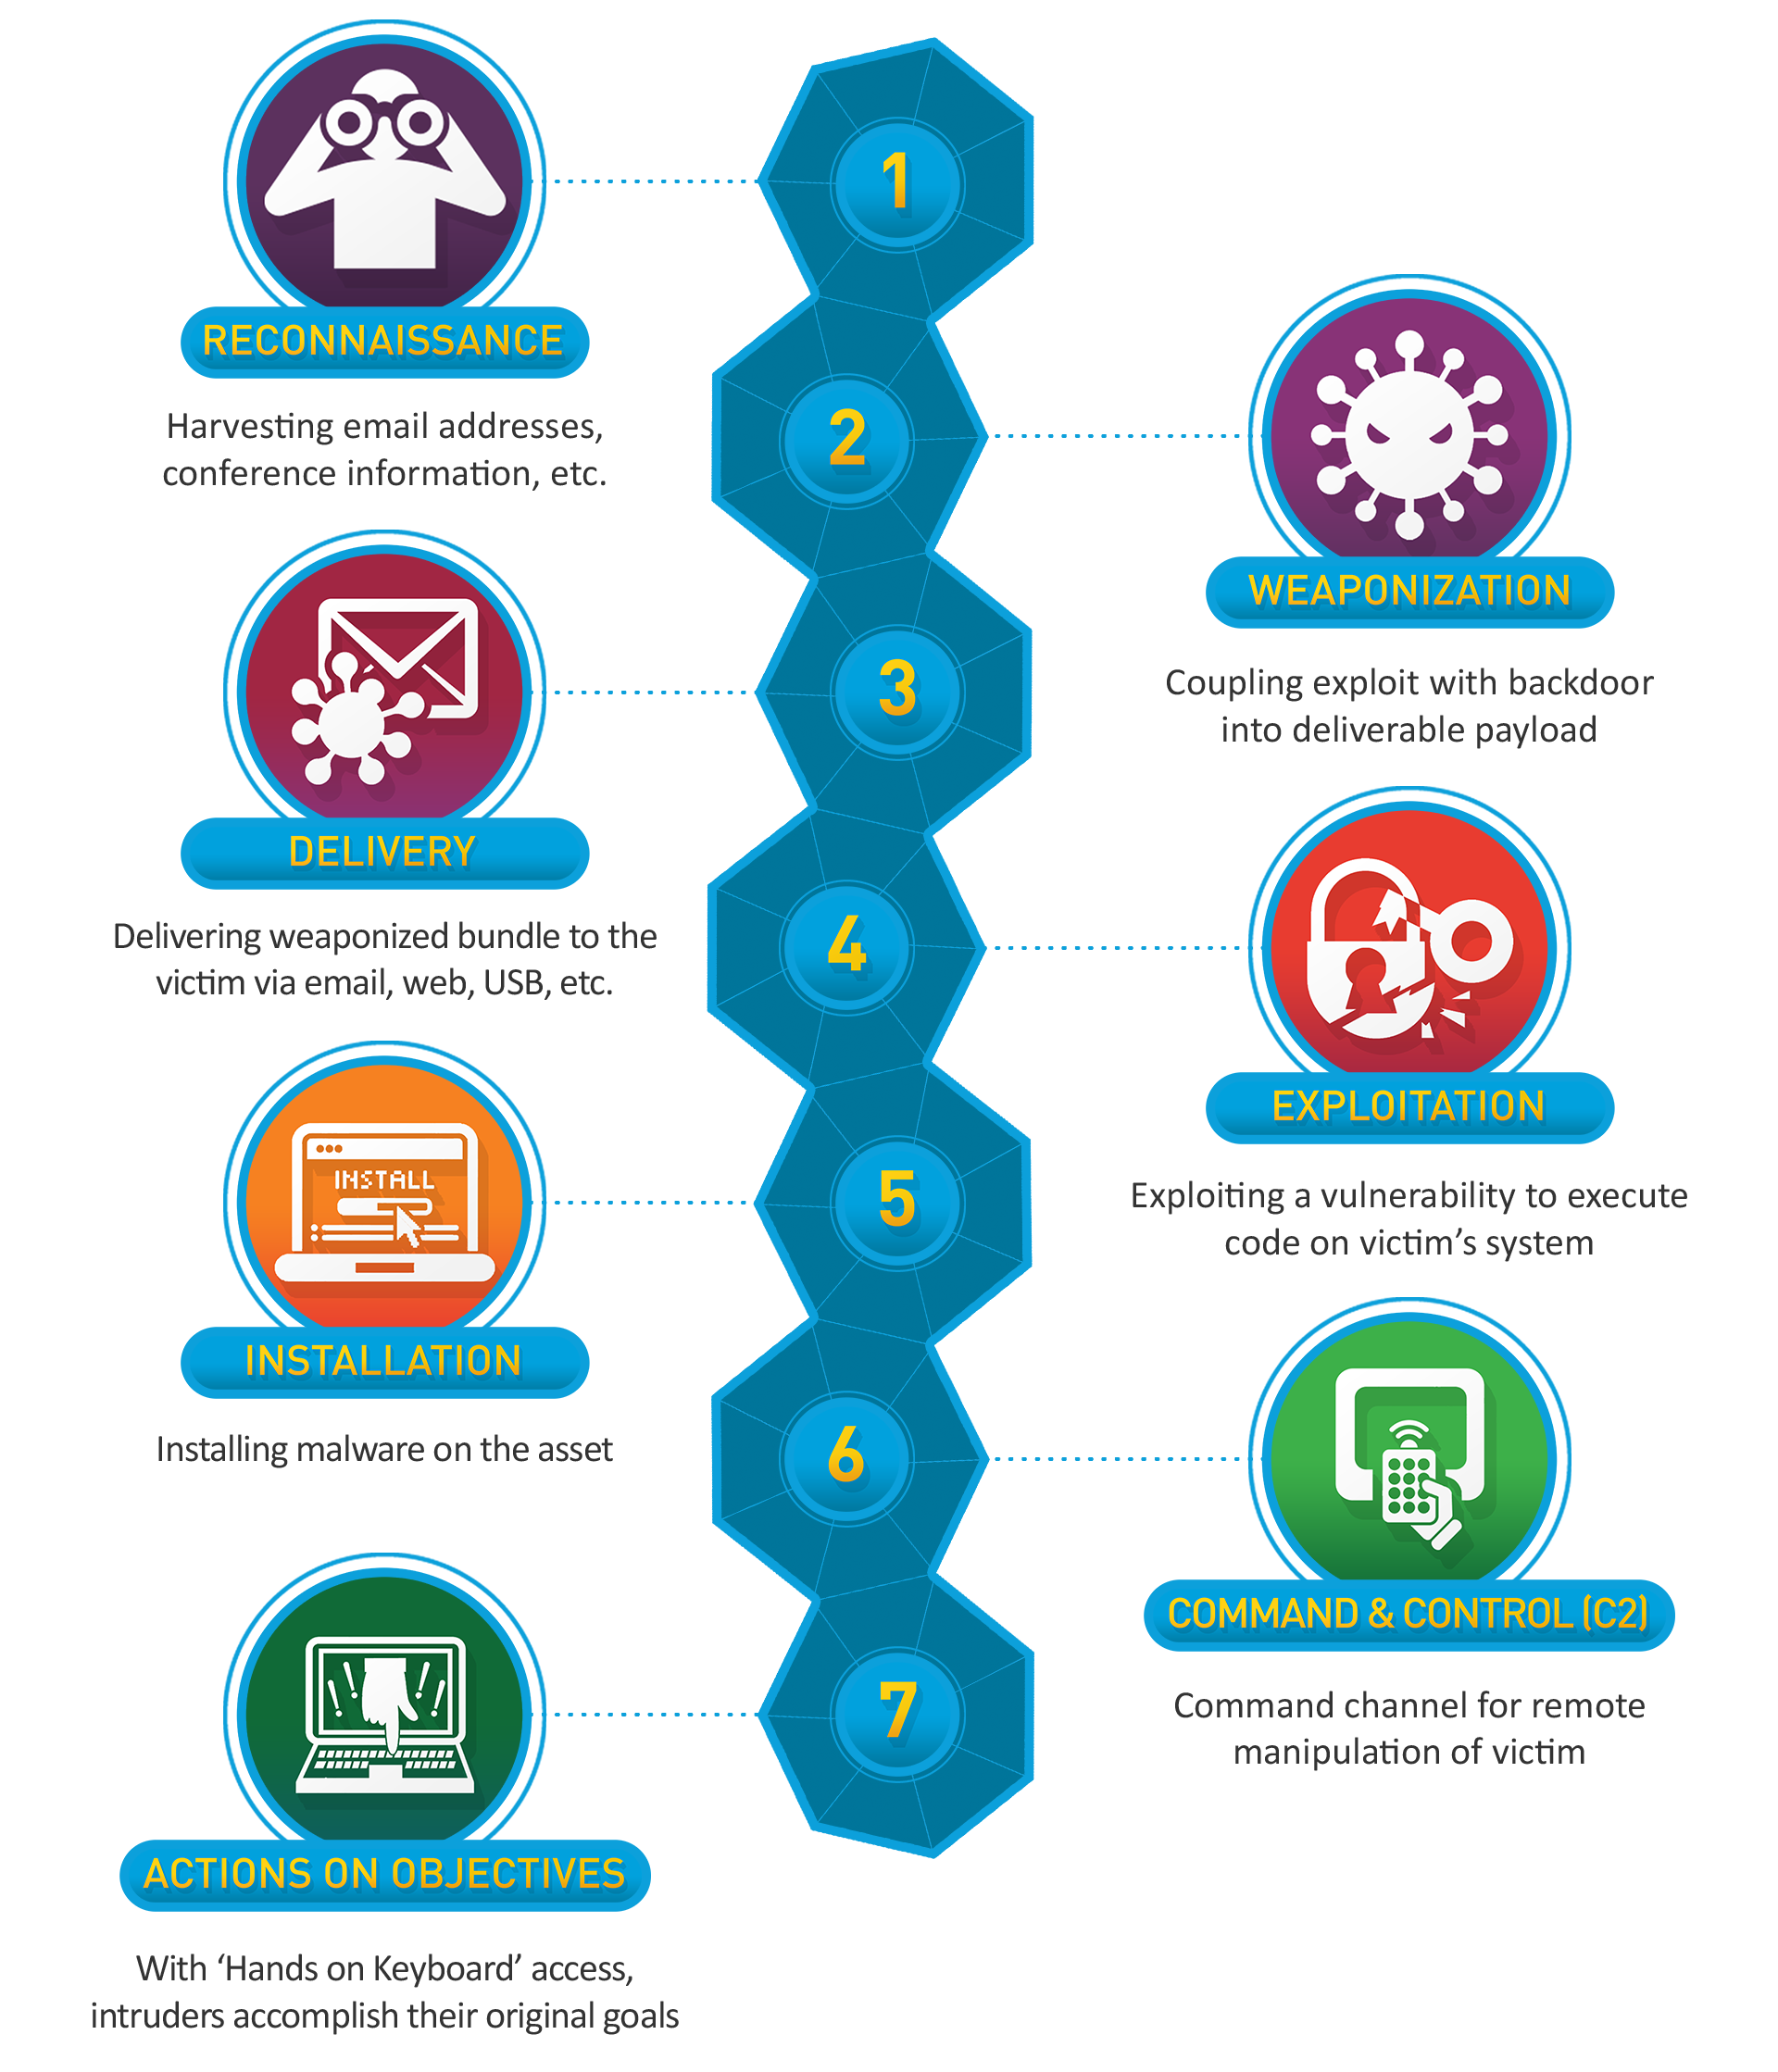
The cyber kill chain is a model that
describes the stages of a cyber
attack, from the initial
infiltration of a target system to
the exfiltration of sensitive data.
The cyber kill chain was developed
by Lockheed Martin and is used as a
framework for understanding and
defending against cyber attacks.
The seven stages of the cyber kill
chain are:
Reconnaissance: The attacker
gathers information about the
target system and its defenses.
Weaponization: The attacker creates
a payload (e.g., malware or ransomware)
to deliver to the target system.
Delivery: The payload is delivered
to the target system, often through
phishing or other social engineering
tactics.
Exploitation: The payload exploits a
vulnerability in the target system to
gain access.
Installation: The payload installs
itself on the target system, often
disguising itself to avoid detection.
Command and control: The attacker
establishes a connection to the payload,
allowing them to remotely control the
compromised system.
Actions on objectives: The attacker
carries out their objectives (e.g.,
exfiltrating data or disrupting
operations).
Understanding the cyber kill chain can
help organizations and individuals identify
the different stages of an attack and take
action to prevent or mitigate the impact of
the attack.
A 'Worst Nightmare' Cyberattack: The
Untold Story Of The SolarWinds Hack
To install Kali Linux with VMware,
follow these steps:
Download the Kali Linux ISO file
from the official Kali Linux
website.
Download and install
VMware
Workstation on your computer.
Launch VMware Workstation and
click "Create a New Virtual
Machine."
Select "Installer disc image
file (iso)" and browse to the Kali
Linux ISO file that you downloaded.
Click "Next."
Enter a name for the virtual
machine and select a location to
store the virtual machine files.
Click "Next."
Select the type and version of
the operating system you are
installing (e.g., "Linux" and "Debian
64-bit"). Click "Next."
Set the amount of memory (RAM)
to allocate to the virtual machine.
It is recommended to allocate at
least 2GB of RAM to Kali Linux.
Click "Next."
Select "Create a new virtual
disk" and choose the size of the
virtual disk. It is recommended to
allocate at least 20GB of space for
Kali Linux. Click "Next."
Review the virtual machine
settings and click "Finish" to
create the virtual machine.
Power on the virtual machine and
follow the on-screen instructions to
complete the Kali Linux
installation.
Note: It is recommended to allocate
at least 2 cores and 2GB of RAM to the
virtual machine to ensure adequate
performance.